As passionate bakers and home business owners, we know that your treats are not just baked goods; they are edible works of art. That's why we're here to lend a helping hand and ensure that the love and talent you pour into your creations shine through in your photos.
In this blog post, we'll share our top tips and tricks for getting the best photos of your cakes, cookies, and other treats with your phone. No costly DSLR camera, studio lighting, or expensive software is needed for beautiful cake photos.
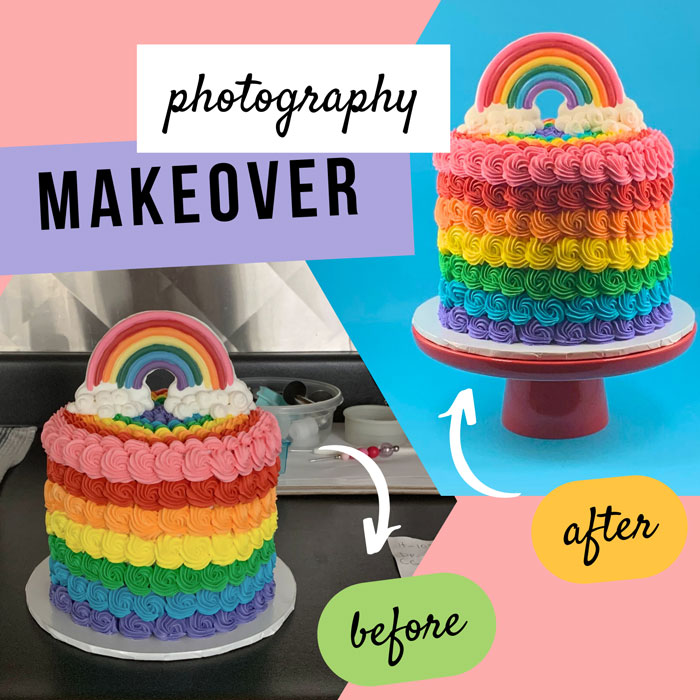
Get to Know Your Phone's Camera
When it comes to cake photography, having a good camera is important. But not everyone can afford expensive equipment or wants to carry a bulky camera around. Luckily, most modern smartphones have cameras with excellent image sensors that allow you to take high-quality pictures. With a few simple tips and tricks, you can use your phone's camera to capture stunning shots of your cakes.
Most smartphone cameras are equipped with a portrait mode, which helps blur the background (called bokeh) and make your subject stand out. This can help bring attention to the details of your cakes without making them look too busy. If you don't have a portrait mode, you can also use a photo editing app for a similar result.
If you're new to photography and want to get great results, it's important to familiarize yourself with your camera and its settings. To start, find a prop that will give you something interesting to photograph. Take time to experiment and learn how the different settings and modes on your phone's camera affect your photo.
Photo Mode vs Portrait Mode
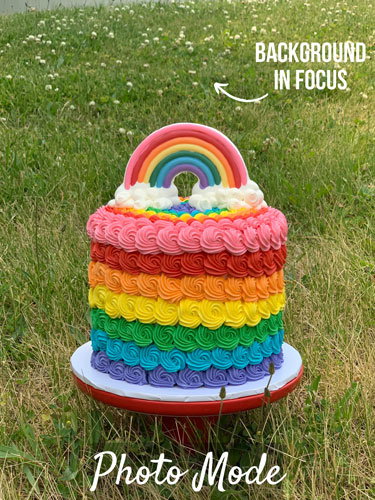 Photo Mode
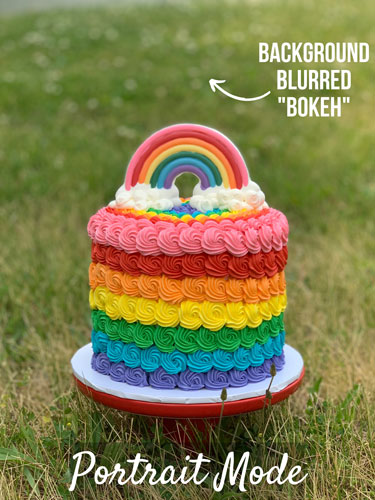 Portrait Mode
Natural Lighting for Beautiful Cake Photos
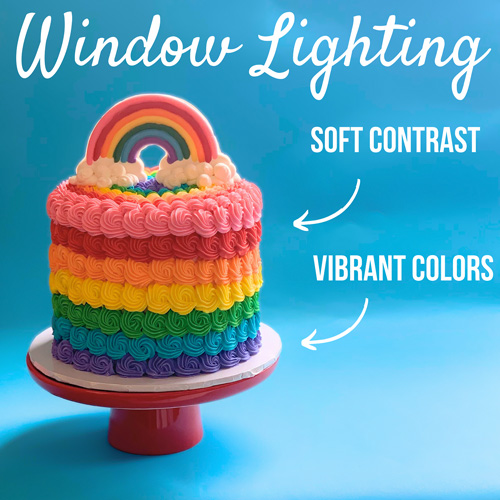
Lighting is key when it comes to taking great cake pictures. Whenever possible, use natural light to illuminate your cakes. Position your cake close to a window, but not in direct sunlight as this can create harsh shadows. Or take your creations outdoors for beautiful natural lighting.
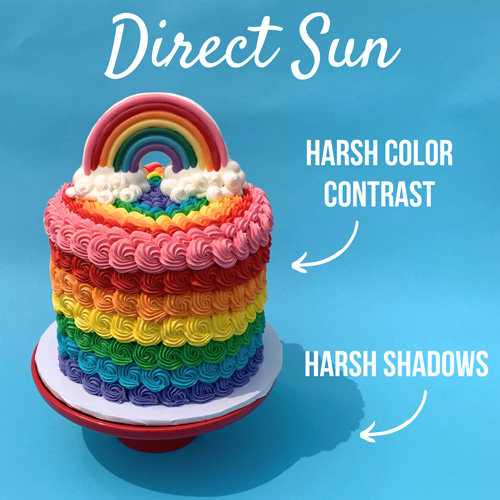
Avoid taking pictures in low or poor lighting conditions, which can make your cakes look unappetizing or unappealing. Although natural lighting is best, direct sunlight can also create unwanted effects like harsh shadows and high contrast.
LED lights are a great option for cake decorators and treat makers since they stay cool. Some lights produce enough heat that could melt your icing, decorations, or chocolate-dipped treats.
5 Tips for Using Natural Light for Cake Photography
- Choose the Right Time of Day: The best time to capture natural light for your cake photography is early in the morning or late afternoon (this time is called the "golden hour" in photography). This is when the light is soft and warm, creating a beautiful glow in your photos.
- Find the Perfect Spot: The ideal location for your cake photography is next to a window with plenty of natural light. Move your table close to the window, but avoid direct sunlight on your cake.
- Pay Attention to the Direction of Light: Position your cake so that the light falls on it from the side or at a slight angle. This will create a beautiful play of light and shadows that add depth to your photos.
- Watch Out for Harsh Light: While natural light is beautiful, direct sunlight can be harsh and create unflattering shadows. If the sun is shining too bright, use a sheer curtain or diffuser to soften the light.
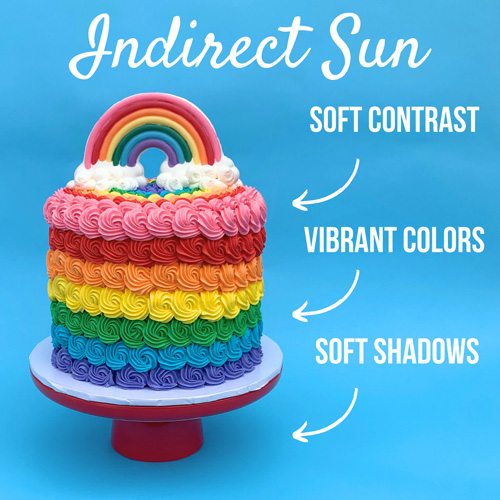
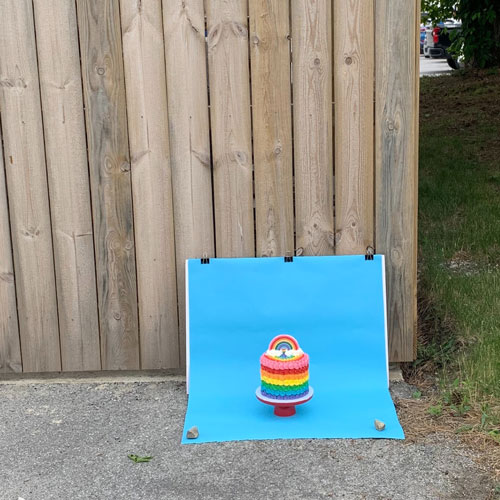
- Go Outside: If you can't find the perfect lighting inside, take your creation outdoors. Photos on an overcast day or in a lightly shaded area produce beautifully lit photos. See our indirect lighting photo below which was taken in an area blocking the direct sun. It produced a photo with vivid colors, soft contrast, and soft shadows.
Indoor Lighting vs Window Lighting
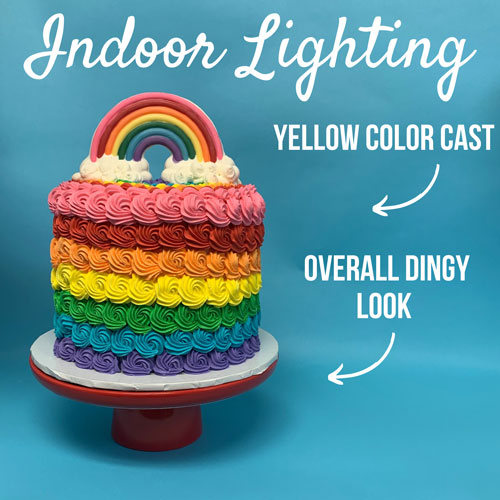 Indoor Lighting
 Window Lighting
Direct Sun vs Indirect Sun
 Direct Sun
 Indirect Sun
Indirect Sun and Window Lighting Setups
 Indirect Sun Photography Set-up
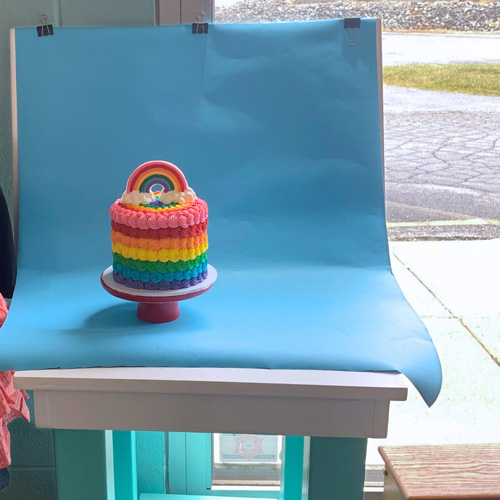 Window Lighting Photography Set-up
What if Natural Light is Not an Option?
Did you pull another late-night baking session for an early-morning delivery? No worries, if natural light is not an option, you can achieve great shots using artificial lights and free photo editing programs, like Canva or Pixlr.
Photo Editing Using Canva
Look for a well-lit area and avoid using your camera's flash. Be aware that different light sources create different color casts in your photos. Incandescent lights will cast a yellow tint onto your photo while fluorescent lights can leave an unflattering greenish hue.
Most free photo editing programs have the option to change tint and hues to color-correct your photos. Here we used Canva to edit our indoor lighting photo with three simple settings: white balance temperature, brightness, and vibrance.
Before and After Photos
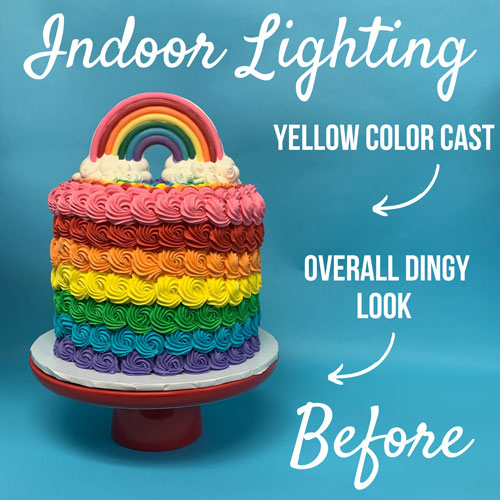 Original Camera Image with Indoor Lighting
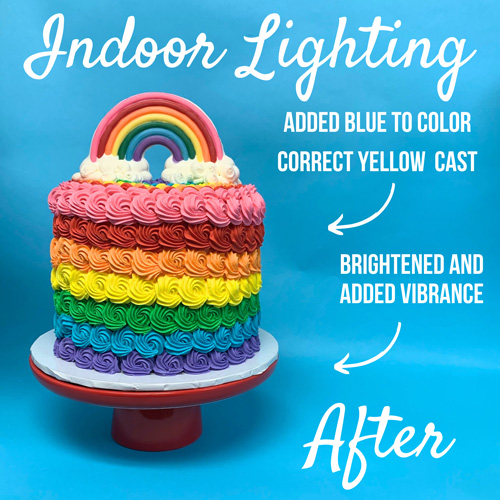 After with Some Easy Canva Edits
Canva Settings Used to Fix Photo
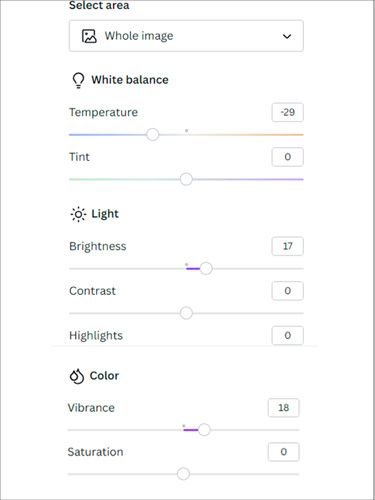 Canva Settings
Create a Lightbox for Indoor Cake Photography
If late-night baking sessions are the norm, a lightbox would be a great investment for your business. At Country Kitchen SweetArt we put together an affordable lighting setup for our product photography using two Lowel Ego lights and two LED tabletop photography lights. Here is a link to directions for making a lightbox on a shoestring budget by Fix the Photo.
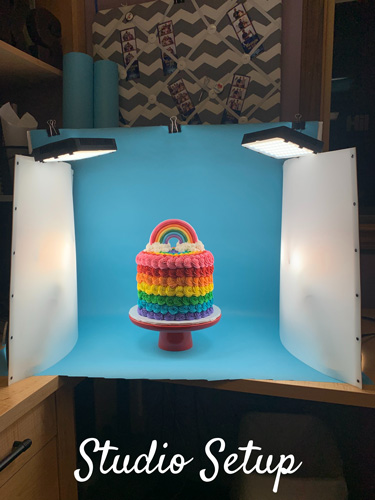 Affordable Indoor Studio Set-up
 Indoor Studio Image Result
Stylize Your Cake Shoot
Stylizing photographs of your cakes when selling them can be beneficial in several ways:
- Makes your cakes look more appealing and attractive to potential customers, which can increase sales.
- Helps to create a brand image and differentiates your cakes from competitors.
- Showcases the quality of your cakes and demonstrates your skills as a baker or cake decorator.
Overall, stylizing photographs of your cakes can help to create a positive and professional image for your business and attract more customers.
Photography Backgrounds
Choosing a neutral or complementary colored backdrop for your cake can make it stand out and enhance the photo. Consider using a white foam board or a white background for wedding cakes or pale-colored cakes. For dark-colored cakes, use a contrasting background to make the cake pop. Either way, make sure to stay away from shiny materials. Shiny backgrounds will reflect light, which will cause a visual distraction.
For businesses, it is best practice to have a cohesive look with backgrounds that are on brand. Many prefer a white or neutral background and others prefer backgrounds that match a color scheme (like all pastels). Props can be nice but can take away from the main focus - your cakes.
10 Cheap & Easy Photography Backgrounds
- Foam Board
- Fabric (Table Cloths, Curtains, Sheets, Scraps)
- Poster Board
- Scrapbook Paper
- Wrapping Paper
- Wallpaper
- Peel & Stick Wood Vinyl Tiles
- White or Colored Bulletin Board Paper
- Ceramic Tile
- Neutral Painted Wall
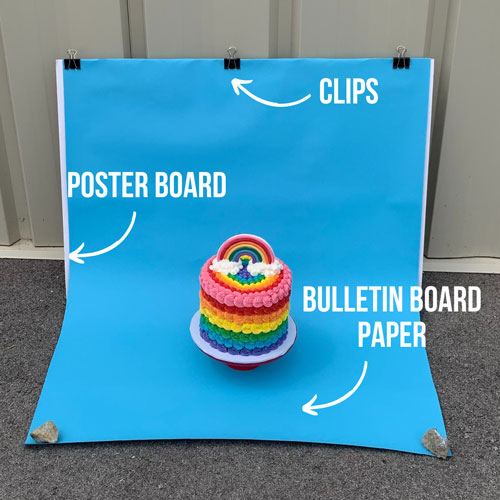 Simple Photography Background
Taking the Perfect Shot to Showcase Your Cake
Know Your Angles
Now that you know how to work your camera, found a great spot for natural light, and the perfect set-up it is time to get shooting. We suggest taking multiple photos from all different angles to achieve the perfect shot. Take some classic straight-on shots, then shoot from above and below, and take some overhead shots. Take close-up shots of fine details.
Make sure to check your camera roll as you go to ensure all your photos are in focus. Zoom in on the details. Nothing is worse than uploading your photos and they are of poor image quality.
 High Angle
 Front Angle
 Low Angle
 Close-Up
What About Old Photos?
You now have the knowledge to take perfect shots of your sweet creations. But, what can you do about old photos? With some simple photo editing tricks and a free editing site, like Canva, you can turn bad photos into good.
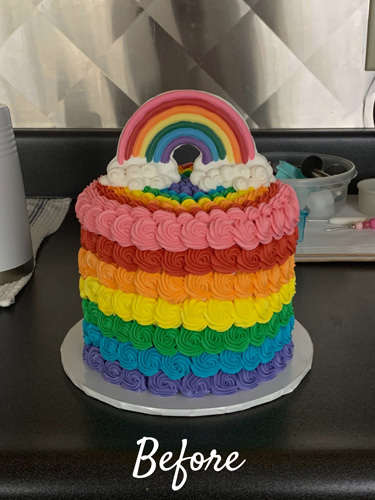 Old Image with Background Clutter
 Updated Old Image Using Canva
Simple Photo Editing with Canva
Canva has a background eraser called "BG Remover" that removes busy backgrounds with one click. Please note that lower-quality photos may be harder for the program to remove the background completely. Canva allows you to erase those items manually in the BG Remover tool.
After the background is removed you will want to add a shadow with the "Shadows" tool. Play around with the settings until you have a natural-looking shadow. Now crop your photo so that your cake fills your screen. Finally, play with the adjustment settings. In this case, we brightened the photo and added vibrance.
All of these tools can be found by clicking on the photo and then clicking on "edit photo". If you are new to Canva and photo editing make sure to play around with settings. Test out what each setting does and how it affects your photo. There is an undo button to remove any edits you do not like.
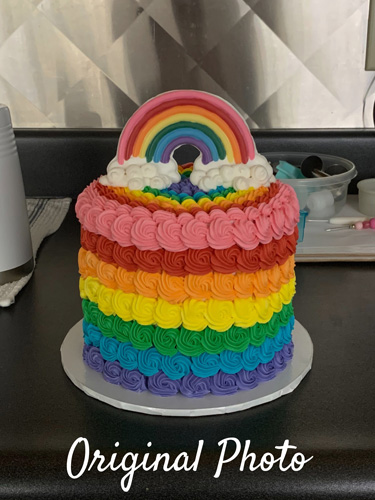 Original Image
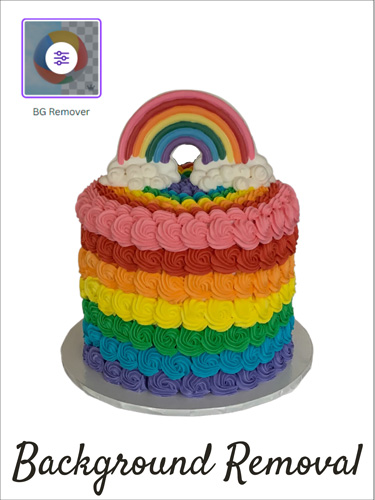 After Background Removal Tool
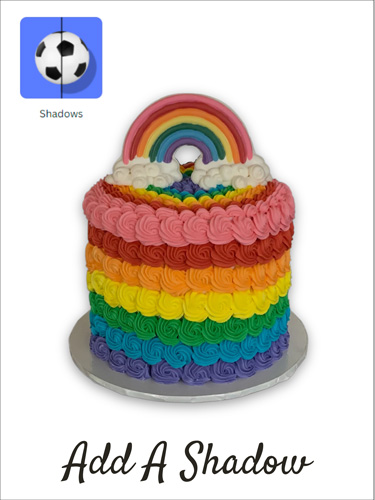 Adding a Shadow
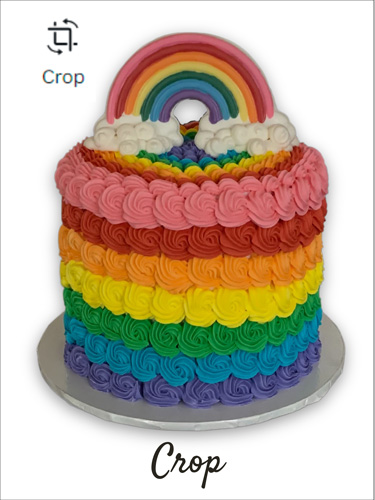 Crop for Close-up
 Brightness and Vibrance Added
Practice Makes Perfect
Taking beautiful photos of your cakes, cookies, and other sweet treats doesn't have to be a daunting task. By following these helpful tips and tricks, you'll soon be able to capture stunning photographs like a seasoned professional photographer. With a little practice, you'll be able to showcase your creations in the best possible light and attract more customers to your business. Happy snapping!
If you happen to use some of these tips please make sure to tag us on Facebook or Instagram!
 Share on Pinterest
 Share on Social Media